For your first dashboard access, you will need to login by using the default admin credentials, which are showed on the log-in form.
After you log-in using the default admin details, you will be re-directed to change the default admin username and password. Please make sure to use a safe password to which only you have access to.
Upon changing the default admin username and password, you will be re-directed back to the login form where you can login using the new admin details which you just entered.
Changing the admin password through admin dashboard
You can change the admin password and username at any time directly through the admin dashboard interface by navigating to “Edit Admin” section. You can set the new admin username and password through the form presented on that page.
Changing the admin password manually
In case you forgot your admin password or username, you can change them manually by editing admin-configuration.php file, which is located inside the root directory of your landing page installation.
All landing pages released after October 1st 2020, will include an admin back-end panel, which allows you to configure all important aspects of your landing page, directly through guided admin user-interface, without having to edit any of the code manually.
In order to access your admin dashboard, you need to navigate to the /admin sub-folder located inside your landing page directory.
Example: If you domain name is called “yourdomain.com” and you uploaded files directly inside the root directory, then the admin dashboard would be accessible on the following URL: “yourdomain.com/admin/”.
First Login
For your first dashboard access, you can login using the default admin credentials which are showed on the log-in form.
After you log-in using the default admin details, you will be re-directed to change the default admin username and password. Please make sure to use a safe password to which only you have access to.
Upon changing the default admin username and password, you will be re-directed back to the login form where you can login using the new admin details which you just entered.
Renaming the admin folder
We encourage everyone to rename the default admin folder and by this make it harder for possible attackers to access the admin log-in form. We recommend to use a combination of letters and characters when renaming the admin folder as showed in the example below.
Example: If you would rename your admin folder to “g4k5e7o9f0j30d” it would then be accessible on “yourdomain.com/g4k5e7o9f0j30d” URL.
You can download the latest version of your purchased landing page file at any time directly from customer profile on our website.
After downloading the latest version of landing pages .zip archive file, you need to upload it to your hosting server. Files should be uploaded inside the same directory where your landing page is currently located while overwriting all existing files.
IMPORTANT: If you are using one of our newer landing pages, which come with a back-end Admin panel support, you will need to make a backup-file or your current db.sqlite3 file located inside the /includes directory, in order to prevent configuration & data loss.
After you upload the latest version landing page files, make sure to copy your db.sqlite3 backup-file back inside the /includes folder to keep all the settings configuration and other data.
In order for your landing page to work properly, you need to make sure that your server configuration is set to support all the required settings and extensions which allow communication between our licensing server and your website.
Suggested PHP version is 7.2 (faster and more secure compared to 5.6)
Minimum PHP version is 5.6 (not recommended)
Required PHP Extensions:
enabled cURL
enabled mbstring
enabled allow_url_fopen
In case you find that your current PHP configuration is not properly set-up, we recommend you to contact your hosting support and ask them to enable the required PHP extensions.
After downloading the .zip archive file which contains your purchased landing page files, you will need to upload them to your hosting server.
To do so, you will need to extract and transfer all the files from downloaded .zip archive file, inside the root or sub-folder directory of your hosting server which is located inside www or public_html folder (both www and public_html are the same folder).
1. Uploading files through File Manager
You can use cPanel native File Manager tool to upload the .zip file to your server.
Login to to cPanel and navigate to > Files section > File Manager
Once File manager is opened you will be taken to home directory by default.
Navigate to the root folder for your website (public_html or www). You can create a subfolder or upload the files directly to your root public_html directory.
Click on the Upload button inside the top navigation menu.
Select your landing page file or simply drag-and-drop it from your local machine.
Once the .zip file is uploaded, you can also extract the archive file by selecting it and click on the “Extract” button on the top nav menu.
2. Uploading files through a FTP client
You can use a FTP client to upload files as an alternative to File Manager tool. Downside of using a FTP client is that there is no option to extract the archive file through it, so you will first need to extract the files on your local machine before you upload them through your FTP client.
There are many FTP clients available, and you can choose one that you find most fitting. We recommend that you use Filezilla FTP client which is free and features a friendly user interface with easy to use server connection menu.
Once downloaded, run the setup file and install the Filezilla FTP Client, once installation is done click on the icon on your desktop to launch the program.
Connect to your hosting server through one of the protocols explained below:
FTPes (explicit SSL mode, encrypted):
Host: ftpes://server your account is hosted on
Port: 21
Protocol: FTP
Encryption: Require explicit FTP over TLS
Logon Type: Normal
User: your cPanel username
Password: your cPanel password
SFTP (SSH-based secure FTP, encrypted):
Host: sftp://server your account is hosted on
Port: 21098
Protocol: SFTP
Logon Type: Normal
User: your cPanel username
Password: your cPanel password
Once you insert the server connection details and login credentials, click on Quickconnect button.
After connection is successfully established through you FTP Client, you can start uploading your landing page files inside the public_html/www folder.
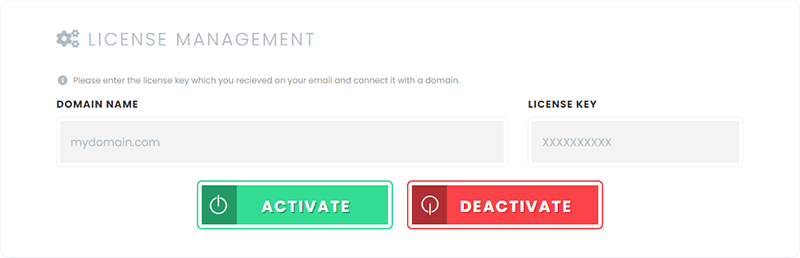
You can manage your license keys by logging in to your customer profile on our website.
IMPORTANT: Your log-in password and username details were sent to the entered email address, after your first purchase. You can find your license key inside the Purchase Confirmation email, which was sent after completed purchase.
Instructions:
Log in to your customer profile
Enter your domain name and license key in appropriate input fields.
Make sure to only use lower-case characters!
Click on Activate button to add the domain name, or Deactivate button to remove it.
Your entered License Key and Domain should now display inside License Overview panel.
After your license key is connected to your domain, you will need to enter it inside the “Home” panel of the admin dashboard.
We have cookies
We use cookies to ensure the best possible experience. By using our site you agree with our Cookie Policy. OK, got it!
Privacy & Cookies Policy
Privacy Overview
This website uses cookies to improve your experience while you navigate through the website. Out of these, the cookies that are categorized as necessary are stored on your browser as they are essential for the working of basic functionalities of the website. We also use third-party cookies that help us analyze and understand how you use this website. These cookies will be stored in your browser only with your consent. You also have the option to opt-out of these cookies. But opting out of some of these cookies may affect your browsing experience.
Necessary cookies are absolutely essential for the website to function properly. This category only includes cookies that ensures basic functionalities and security features of the website. These cookies do not store any personal information.
Cookie
Type
Duration
Description
PHPSESSID
session
Until session ends
This session cookie is necessary for the website’s core functionality. It’s used to maintain user session variables, making it a necessary cookie.
cookielawinfo-checkbox-necessary
persistent
1 year
Cookie used to store user consent for necessary cookies.
edd_items_in_cart
persistent
1 hour
Cookie used by Easy Digital Downloads (EDD) to track items in the user\'s cart.
__stripe_mid
third party
1 year
Stripe cookie used for fraud prevention and payment processing.
__stripe_sid
third party
30 minutes
Stripe cookie used for fraud prevention and payment processing.
Any cookies that may not be particularly necessary for the website to function and is used specifically to collect user personal data via analytics, ads, other embedded contents are termed as non-necessary cookies. It is mandatory to procure user consent prior to running these cookies on your website.
Cookie
Type
Duration
Description
__Secure-ENID
third party
1 year
Google cookie for security and ensuring user session integrity on Google services.
_ga
third party
2 years
Google Analytics cookie used to track user behavior on the website.
_ga_5CGJWZ48E4
third party
2 years
Google Analytics cookie used for tracking multiple sessions.
_GRECAPTCHA
third party
6 months
Google reCAPTCHA cookie used for preventing bots on forms.
AEC
third party
6 months
Google cookie used for security and preventing spam on Google services.
cookielawinfo-checkbox-non-necessary
persistent
1 year
Cookie used to store user consent for non-necessary cookies.
m
third party
1 year
Stripe cookie used for fraud prevention and payment processing on mobile devices.
VISITOR_INFO1_LIVE
third party
6 months
YouTube cookie used for storing user preferences and behavior during YouTube video playback.
VISITOR_PRIVACY_METADATA
third party
6 months
YouTube cookie used to manage privacy settings for YouTube users.
YSC
third party
Until session ends
YouTube cookie that tracks views of embedded videos on YouTube pages.